
| 일 | 월 | 화 | 수 | 목 | 금 | 토 |
|---|---|---|---|---|---|---|
| 1 | 2 | 3 | 4 | |||
| 5 | 6 | 7 | 8 | 9 | 10 | 11 |
| 12 | 13 | 14 | 15 | 16 | 17 | 18 |
| 19 | 20 | 21 | 22 | 23 | 24 | 25 |
| 26 | 27 | 28 | 29 | 30 | 31 |
- pytorch #torch #monai #dice #score #metric #segmentation #loss
- decorater
- 데코레이터
- nfiti
- tqdm #deep learning #dataloader #jupyter #notebook #ipywidgets
- VNet #Vnet #segmentation #3D #voxel #semantic #pytorch #deep learning #UNet
- deep learning #segmentation #sementic #pytorch #UNETR #transformer #UNET #3D #3D medical image
- TeCNO
- nibabel
- PYTHON
- MICCAI
- precision #정밀도 #민감도 #sensitivity #특이도 #specifisity #F1 score #dice score #confusion matrix #recall #PR-AUC #ROC-AUC #PR curve #ROC curve #NPV #PPV
- pytorch #torch #ViT #vit #VIT #Transformer #deep learning #vision #classification #image
- monai
- 확산강조영상
- Surgical video analysis
- 파이썬
- MRI
- RGB #CMYK #DPI
- parrec
- 코드오류
- genetic epidemiology
- FLOPs #FLOPS
- pytorch #torch #torch.nn #torch.nn.Functional #F #nn #차이
- nlp
- words encoding
- Phase recognition
- 확산텐서영상
- 유전역학
- data augmentation #augmentation #3d #deep learning #image # medical image #pytorch #medical #CT #3D
- Today
- Total
KimbgAI
[ML] U-Net(2015.05); Convolutional Networks for Biomedical Image Segmentation 요약 및 pytorch 코드 구현(2) 본문
[ML] U-Net(2015.05); Convolutional Networks for Biomedical Image Segmentation 요약 및 pytorch 코드 구현(2)
KimbgAI 2022. 10. 13. 13:57U-Net에 대한 간략한 내용이 궁금하신 분은 지난 포스팅을 참고해주시면 되겠습니다~
https://kimbg.tistory.com/16?category=578326
[ML] U-Net(2015.05); Convolutional Networks for Biomedical Image Segmentation 요약 및 코드 구현
U-Net(2015.05); Convolutional Networks for Biomedical Image Segmentation 원문: https://arxiv.org/abs/1505.04597 본 리뷰는 Semantic Segmentation의 기술 동향을 살펴보며, 핵심 아이디어와 ..
kimbg.tistory.com
1. 핵심 아이디어 구현
1) Using mirror padding not zero padding
pytorch에서 mirror padding을 통한 conv 연산은 아래와 같이 conv2d 옵션에 간단히 추가만 해주시면 됩니다.
padding_mode = 'reflect'으로 해주시면, input에 대한 mirror padding이 적용됩니다.
import torch

input_ = torch.empty((3,128,128))
myconv = torch.nn.Conv2d(in_channels=3, out_channels=6,
                         kernel_size=3, stride=1, padding=1,
                         padding_mode='reflect')
output_ = myconv(input_)
print(output_.shape)
torch.Size([6, 128, 128])
이 옵션을 좀더 살펴보자면, 기본적인 zero padding은 아래와 같이 적용됩니다.
input_ = torch.tensor([[1, 2, 3],
                       [4, 5, 6],
                       [7, 8, 9]])
pad = (1,1,1,1) # pad last dim by (1, 1) and 2nd to last by (2, 2)
out_ = torch.nn.functional.pad(input_, pad, mode='constant')
print(out_)
tensor([[0, 0, 0, 0, 0],
[0, 1, 2, 3, 0],
[0, 4, 5, 6, 0],
[0, 7, 8, 9, 0],
[0, 0, 0, 0, 0]])
반면 mirror padding은!!
input_ = torch.tensor([[[1, 2, 3],
                       [4, 5, 6],
                       [7, 8, 9]]]).to(torch.float)
pad = (1,1,1,1) # pad last dim by (1, 1) and 2nd to last by (2, 2)
out_ = torch.nn.functional.pad(input_, pad, mode='reflect')
out_
tensor([[[5., 4., 5., 6., 5.],
[2., 1., 2., 3., 2.],
[5., 4., 5., 6., 5.],
[8., 7., 8., 9., 8.],
[5., 4., 5., 6., 5.]]])
2) Using weight map for data imbalance problem
weight map은 앞서 설명드린것처럼, 경계선 검출을 위해 추가된 domain adaptive한 테크닉입니다.
경계선은 세포 검출을 위해 중요한 부분이지만 이미지에서 작은 비율을 차지하기 때문에, 얇은 경계선일수록 높은 가중치주어 잘 검출할 수 있도록 학습 사전에 weight map을 제작합니다.
아래 코드로 weight map을 만들 수 있습니다.
(아래 코드는 https://gist.github.com/rok/5f4314ed3c294521456c6afda36a3a50#file-unet_weight_map-py 에서 참고하였습니다)
import numpy as np
from skimage.io import imshow
from skimage.measure import label
from scipy.ndimage.morphology import distance_transform_edt

def generate_random_circles(n = 100, d = 256):
    circles = np.random.randint(0, d, (n, 3))
    x = np.zeros((d, d), dtype=int)

    for x0, y0, r in circles:
        x += np.fromfunction(lambda x, y: ((x - x0)**2 + (y - y0)**2) <= (r/d*10)**2, x.shape)
    x = np.clip(x, 0, 1)

    return x

def unet_weight_map(y, wc=None, w0 = 10, sigma = 5):

    """
    Generate weight maps as specified in the U-Net paper
    for boolean mask.

    "U-Net: Convolutional Networks for Biomedical Image Segmentation"
    https://arxiv.org/pdf/1505.04597.pdf

    Parameters
    ----------
    mask: Numpy array
        2D array of shape (image_height, image_width) representing binary mask
        of objects.
    wc: dict
        Dictionary of weight classes.
    w0: int
        Border weight parameter.
    sigma: int
        Border width parameter.
    Returns
    -------
    Numpy array
        Training weights. A 2D array of shape (image_height, image_width).
    """

    labels = label(y)
    no_labels = labels == 0
    label_ids = sorted(np.unique(labels))[1:]

    if len(label_ids) > 1:
        distances = np.zeros((y.shape[0], y.shape[1], len(label_ids)))

        for i, label_id in enumerate(label_ids):
            distances[:,:,i] = distance_transform_edt(labels != label_id)

        distances = np.sort(distances, axis=2)
        d1 = distances[:,:,0]
        d2 = distances[:,:,1]
        w = w0 * np.exp(-1/2*((d1 + d2) / sigma)**2) * no_labels

        if wc:
            class_weights = np.zeros_like(y)
            for k, v in wc.items():
                class_weights[y == k] = v
            w = w + class_weights
    else:
        w = np.zeros_like(y)

    return w
아래는 테스트 데이터를 받는 코드입니다.
import matplotlib.pyplot as plt

x_path = './x.jpg'
y_path = './y.jpg'

try:
    x = plt.imread(x_path)
    y = plt.imread(y_path)

except:
    import urllib.request
    x_url = "https://github.com/alexklibisz/isbi-2012/raw/master/data/train-volume.tif"
    y_url = 'https://github.com/alexklibisz/isbi-2012/raw/master/data/train-labels.tif'
    x_mem = urllib.request.urlopen(x_url).read()
    y_mem = urllib.request.urlopen(y_url).read()
    with open(x_path, mode="wb") as f:
        f.write(x_mem)
    with open(y_path, mode="wb") as f:
        f.write(y_mem)


plt.subplot(1,2,1)
plt.imshow(plt.imread(x_path), cmap='gray')
plt.title('img')
plt.subplot(1,2,2)
plt.imshow(plt.imread(y_path), cmap='gray')
plt.title('label')
plt.show()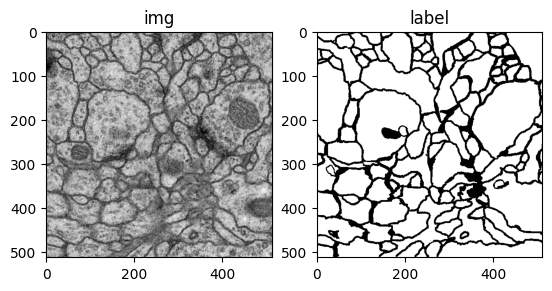
위에서 받은 label img을 가지고 weight map을 구하면 아래와 같습니다.
wc = {
    0: 1, # background
    1: 5  # objects
}

weight_map = unet_weight_map(plt.imread(y_path), wc)

plt.subplot(1,2,1)
plt.imshow(plt.imread(y_path), cmap='gray')
plt.title('label')
plt.subplot(1,2,2)
plt.imshow(weight_map, cmap='gray')
plt.title('weight map')
plt.show()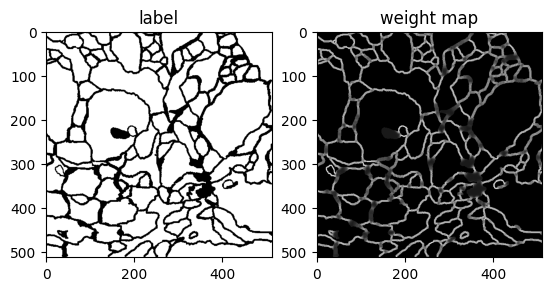
보이시는 것처럼 경계선이 얇을 수록 밝게(큰 값) 나오는 것을 볼 수 있습니다.
이 weight map을 학습시 모델의 output에 element wise multiplication하여 적용할 수 있겠습니다~
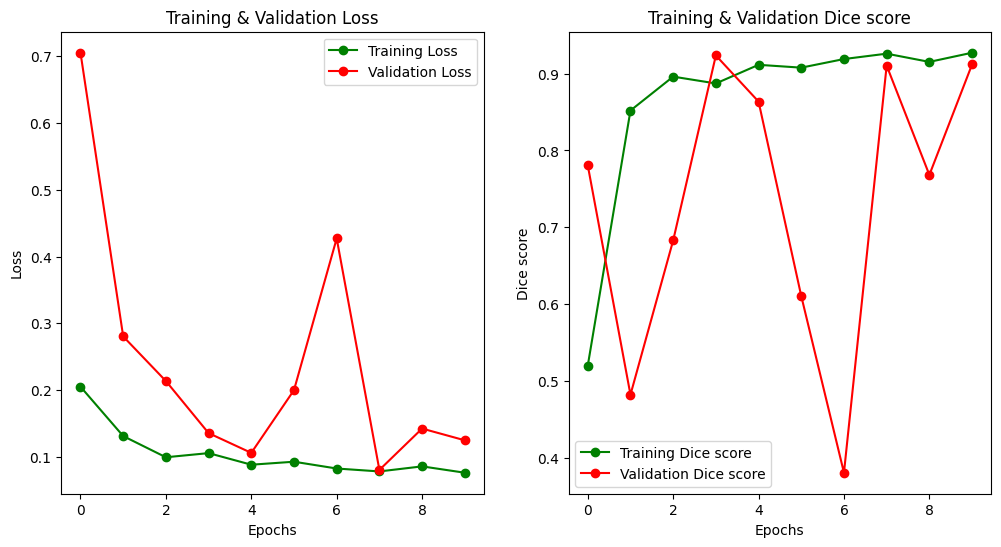
2. 전체 코드 (데이터로드부터 학습 및 결과 확인까지)
데이터를 다운받고, 전처리, 로드, 학습, 결과 확인까지 아래의 깃허브에서 확인할 수 있어요.
(ipynb를 여기에 올리려니 너무 번잡스러워서..)
코드 중 데이터가 존재하는 곳으로 root_path만 수정해주시면 됩니다
(torch가 아닌 다른 패키지들이 있을텐데 설치해주세요 monai 등..)
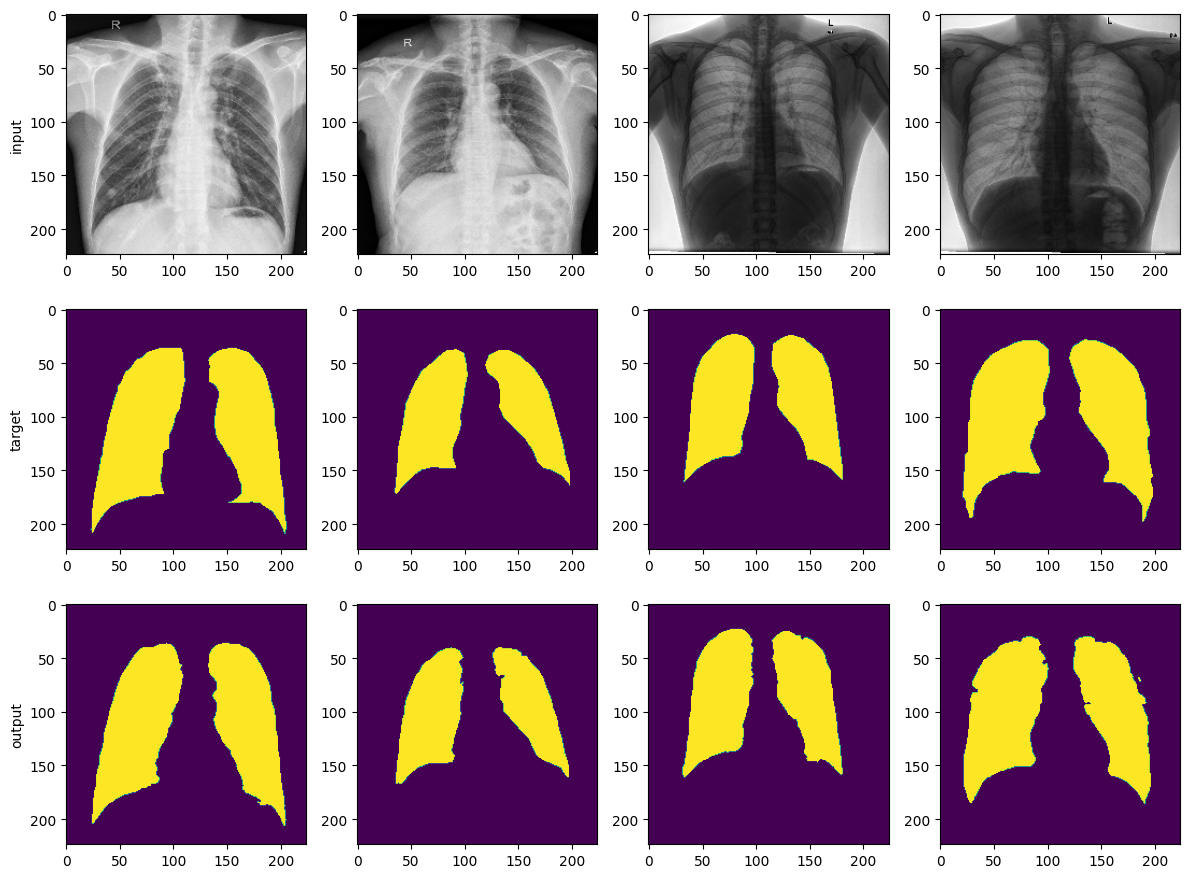
데이터는 kaggle에서 제공하는 Chest X-ray의 폐 영역을 segmentation하는 task에요.
https://github.com/kimbgAI/Segmentation2D
GitHub - kimbgAI/Segmentation2D: 2D Segmentation tutorial with pytorch
2D Segmentation tutorial with pytorch. Contribute to kimbgAI/Segmentation2D development by creating an account on GitHub.
github.com
결과만 보자면.. FCN과 비슷하게 잘 나오는 것 같습니다~ :)
끝!


